Color Cycling in Pixel Art 2: Unity
Source code: https://github.com/Deivore/BlendShift.git
In my first part, I described what color cycling is and how it has been used in games to date. Today, instead of a how-to on making your own color cycled pieces I’m just gonna skip ahead to part 3 for now: Using color cycling in Unity, and snazzing it up beyond the discrete cycles from Pro Motion to blend between the frames using “Blendshifting”. As far as I can tell, the first person to do this was Joe Huckaby back in 2010:


Interestingly, the above gif is really unable to capture the same image on the website. This is because while the gif’s update frequency is limited by the number of frames in the image, the HTML canvas is limited by your computer’s frame rate. Cool!
So what do I do with a Pro Motion .pmp file?
Joe’s code uses the “.lbm” extension of the old Deluxe Paint DOS editor. Luckily Pro Motion exports to this filetype, so no “.pmp” parsing for us! With a few modifications to the lbm2json program from Joe’s repository, we have a JSON file that’s up to date with the current standards. Let’s take a look!
These JSON file have 6 fields: “filename”, “width, “height”, “colors”, “cycles” and “pixels”. Colors and cycles are themselves JSON objects: colors has “R”, “G”, “B” which are 0–255 values, and cycles has “reverse”, “rate”, “low”, and “high” which are all positive integers.

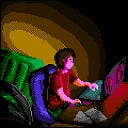
The first three are all straight forward. Since Pro Motion produces images with a 256 color palette, the “colors” array has 256 objects each with three color channel values of 256 possible values each. “Pixels” contains a number of entries equal to the images width times its height, and are each 0-255 corresponding to an index in the “colors” array. In the example image above, the 8 purple sky colors are the first ones in the palette in the lower right, so they take up indices 0-7 and each entry in “pixels” that uses a sky color will have a value from 0-7.

The “cycles”, or gradients, have the fields “reverse”, “rate”, “low”, and “high” as described above. “Reverse” describes how we move through the cycle: forwards, backwards, with a sin wave, or forwards then backwards. “Rate” describes the speed of the cycle, with a higher rate having a faster speed. Finally “low” and “high” are the indices of the first and last entry in the palette, respectively. The above gradient starts on the 64th palette entry and goes through the 72nd, so it’s “low” and “high” are 63 and 71, respectively since proper arrays start at 0.
Shader Magic
In order to draw these properly, we’ll need to save the indices, palette, and cycles information separately. Via the code FOUND HERE, I export an image of the same width and height as the original, but with every pixel’s color equal to its index instead of the color value. This will allow the shader to hook in later on.

While this looks alien, remember that the color values really have nothing to do with their original’s values: the sky is black simply because the sky colors are indices 0-7. The greenish wall colors in the original image are right at the end of the image, so their entries are 249-255 and are very bright, since pure white is 255. The smoke right in the middle of the palette and shows up about 55% gray, as we’d expect. We also export a palette image, and create a material, sprite renderer, and script to hold these values for our shader, which is actually quite a simple one, at least for now. Its business end is the fragment shader, which is as follows:

All this does is grab a color found at the pixel’s location (from 0.0 to 1.0), convert it to a 256 color (from 0 to 255), and return a look-up value from the palette for that index. Without any special modifications, we get an image that looks like a gif:

That’s our image with its color cycles running as can be seen in the editor, with the notable difference that we don’t have to have aligned cycle times. Image projects that would export to gifs with 10,000+ frames can be very safely dropped into Unity and can have any misaligned rate you may want.
Blendshift
However, since we have all these nice cycles, we can now interpolate between them on a frame-by-frame basis, known as blendshifting. How is this different from what we’re already doing? Well I’m glad you asked!

As you can see the Blendshift approach creates a smoother gradient without as much of that choppy feel from the above gif. The approach is fairly straightforward: instead of throwing away the partial frame in our calculation, we just use it to interpolate between the current palette index and the next as:
framePalette[currentIndex] = truePalette[IndexNext] — (truePalette[IndexNext] — truePalette[originIndex]) * (cycleOffset%1);
This gives us a smooth result in Unity!

In my next part I’ll go through actually making a .pmp or .lbm color cycling file in Pro Motion!