Dynamic 3D Sprite Lighting in Unity
Sprites in Daedalus make use of Unity’s lighting system to appear with 3D-like properties.
Since Unity treats Sprites as flat 3D surfaces, it can do this by applying a shader in the sprite’s material that accepts a normal map, and using that normal map to calculate how light should be applied. But what does that all mean, and what how does one actually do it? I’m first going to talk about the technical details, but if you’re already familiar you can skip the next section on making normals.
You can also find a link to the shader I’m using at the start of the final section.
Normals and Normal Maps

First, let’s talk about what a normal map is and what it’s used for. 3D surfaces have a surface normal, that is, the direction perpendicular to the plane of the surface. In Unity2D, that plane is almost always the X-Y plane (green and red arrows), making the normal vector purely in the Z direction.
When people first started rendering 3D environments and assets, their computers couldn’t afford to render many different surfaces. Early 3D games are famous for having an extremely blocky aesthetic. One way to get around this is a shader that uses vertex information to estimate lighting and interpolate it.

It works by using the normals of the vertices rather than the surfaces, and interpolating between them to estimate the lighting at each pixel.
However, for a much finer grade control we can use a special shader with a normal map. A normal map is a texture that describes modifications to a surface’s normal.

Psychadelic! But what’s up with those colors exactly? And why is it all so purple?
As you may have figured out, the normal map is mapping color to different normals. Since color is represented as a 3 part vector of Red, Green, and Blue, it makes sense to map these colors to their respective directions of X, Y, and Z (you can even see this mapping in the Unity3D view picture above).
Let’s take a look at the different color values to see what’s going on. There are a few things interesting about these values. First, the center of the sphere and the background color are the same. Second, the blue value ranges from 50% to 100%, but the red and green use the whole spectrum. Why?

The mapping of 0 through 255 of a color value is mapped to the -1 to +1: a value of 128 is mapped to 0. This means that a normal vector of (0,0,1) will map to (128, 128, 255), which happens to be the background color. Remember how the normal of the 2D surface was entirely in the Z direction? That means that a light ray shining into the surface normal will be reflected back along the surface normal. A color that’s 50%R, 100%G, 50%B will face up (positive Y); a color that’s 75%R, 25%G will face to the bottom right; 0%R, 50%G will face to the right, and so on.

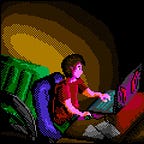
In this example, there is a light in the center of the console. Rix is lit up on her chest, her chin, and the bright pink part of her hair. Given this, we would expect the normal map to have a color on her chest that looks like the right of the sphere example, a color on her chin that looks like the bottom-right of the sphere example, and a color on her pink hair highlight that resembles the top-right of the sphere example. Not only does this all check out, but other body parts like her elbow are colors that face away. Nice!
Creating a Normal Map
There are 3 ways I’ve explored of making a normal map: using an external tool, drawing a height map by hand, and drawing a normal map by hand.
For the first, I’m going to plug a tool I think is phenomenal, SpriteDLight.

This app can take in a sprite sheet, gives you a few options as to how sharp and deep the bumps are, and spits out a normal map sheet that can even be previewed within the program! It takes into account differences edge differences between different colors and the transparency, and is excellent for characters.
Since sprite sheets are a bit of a different animal, I tried two ways of making normals for them: converting from height hand painted height maps, and pure hand painted normals.
Let’s take a look at a section of the ship’s sprite sheet to see what we’re giving normals to:

In a height map, the brightness of a color corresponds inversely with its depth: darker colors are deeper. They don’t have to be grayscale, but the system I believe only looks at a colors brightness regardless. They work best when the sprite sheet contains no unnatural logical transitions: when you put tiles next to each other that are of different heights and would NOT be next to each other in games, you can get some problems.

As you can see, the map is not entirely filled out because I soon realized the process would not work well on my particular sprite sheet, and that it might be hard to make sheets that meet the requirements listed above. After trying this out, I instead began to hand paint normals, using a palette of 17 colors, and this worked out much better for me:

This is the approach that I would generally recommend for people: it doesn’t take a lot of understanding to make work, and one can paint with fairly broad and non-detailed strokes to get a good result.
Use a Normal Map in Unity
The current normal map shader I’m using , which I hope to find the original source for soon, uses a bump map argument, “Normalmap”, to shade both sides of a Sprite (for users that flip sprites by multiplying the X scale by -1).
When one creates a new Sprite via the Create menu, Unity populates it with a few default options, including the “Sprites-Default” Material which uses the “Sprites/Default” shader.
Further information can be found at Unity’s rather nice documentation page on normal maps. To sum up, you’ll need a material with a shader that uses a normal map, attach that to your sprite object, and supply your custom normal map in the normal map argument. Pop a few lights into your scene and viola, dynamic lighting!

If you liked this, consider giving me a follow on Twitter! I can be found @thedeivore and I post updates to this and other projects as often as I can.
Thanks for reading!