Color Cycling Part 3: Making Color Cycled Art
For years, the great philosophers have asked: is Stephen ever going to make color cycling part 3? Well buckle up, we’re going to Art ourselves some pixels.
Part 1: What is color cycling? | Part 2: Importing it into Unity
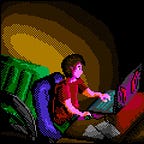
I’ll be starting with this image in I’ve been working on for just this article:

Our goal will be to create compelling color cycles in the river that will fall into a couple categories: creating a division between the top shore and the river, creating an illusion of motion of the river’s current, distorting the reflections of the far shore, and mimicking the fresnel effect of water.
Shoreline
We’ll start with the river-shore division since that’s the easiest and most straightforward, and provide the most basic parts of the practice. What we want to do is blend between the shore color and a water color in such a way that creates an illusion of motion. To do this we’ll capture the shore color, then create a lopsided gradient towards a water color and back again.
Next, we’ll set up our gradient for color cycling, and draw some solid lines to fill over with our gradient. Next we’ll create a long band of a single color using one of our obnoxiously bright stencil colors at the front of the palette. Since this water is far away, its motion should appear slower than water moving the same speed close to the viewer, so we’ll want the cycle to have a slow speed like 8, and make alternating stencil lines of 10 or so pixels. Be sure to enable the gradient for color cycling!

Once these points are all set up, we’re going to fill each line segment with a horizontal gradient. We can then toggle the color cycling animation key (default: numpad star) to see the result:
Applying this same general principle to the rest of the shoreline will create this effect throughout.
Reflections
Water distorts objects it reflects by noisy horizontal displacement. Reflections are also often blurred vertically, and can appear “chopped up” by waves so that parts outside the bulk of the reflection still occasionally reflect their subject. Objects close to the water appear to be much taller than those further away and can occlude objects seen normally in the rest of the scene. Finally, reflections can show objects hidden from the viewer, such as the underside of bridges. We’ll take this all into account when creating our static reflections, which we’ll then distort further with color cycling.

River Current Motion
To create a nice river current we’re going to have a few overlapping currents dithered together to create motion. However we’re going to want a few more stencil colors to accomplish this. We’ll start out by creating 2 new sets of stencils at the bottom of the palette. It doesn’t really matter what colors they are as long as they’re distinctive.
Next, we’ll map out the currents on a new layer using the same strategy as the first cycle. We want them to behave differently from each other, taking slightly different directions.
Using the first gradient, we’ll fill in a simple horizontal line contour gradient with a stencil gradient.

For the second gradient however, we’ll have to get creative. Until Pro Motion comes out with a Linear Contour Gradient fill, we’ll have to make do with a creative solution. We’ll select the gradient that isn’t cleanly horizontal or vertical to out brush, and increase the size of the image if needed. Next we’ll rotate it into a position where we CAN use the fill.

We’ll fill in each section of stencil with the other stencil gradient, rotate it back into alignment, draw it over the original, and then resize our image back to normal if needed. This will require some cleanup afterwards, but we’ll then have our stencil layers!
We’re going to be making several copies of each of these to fill over with different color cycles. Make sure you are editing COPIES and NOT the originals!
Next, we’ll create a stencil layer to overlay the two. Copy either layer, then press Shift+D convert the colors to your current foreground color. Select a stencil color and your transparency color, and press ALT+F1 to draw with both colors in a dither, then draw them in a new layer.

Then, copy one of the layers, pick the transparent color as a stencil, and paste over the layer dithered with a stencil color and transparency. Then, merge that layer over a COPY of the other stencil layer. You should now have a dithered version of those gradients!

I’m going to fill in all the orange gradient in with the purple gradient color-by-color to make a master wave stencil that we’ll use for several color cycles.

Distorting the Reflections
Now we’re going to start making some undulating motions on our reflections. We’ll do this in two basic ways, depending on how far the cycle is from the viewer.
For close up cycles, create a copy of the something to distort, in my case the reflection of the trees. I’m going to combine all the dark colors by selecting the paint dropper tool with “Isolated Fill” UNCHECKED, and paint over all green colors with the same green color. Then, create a gradient of the background color and one of the stencil colors and, using it, select the paint dropper tool in “Inline Countour Gradient” mode to color in the green from the whole scene. We’ll erase the other colors, as well as some of the stencil further away from the viewer, and come away with this:

Now we’ll paste our master water current stencil over it. It’s a bit hard to line everything up here, so I recommend creating a little marker to help. Draw overlapping rectangles of different colors on the master stencil layer and the stencil layer for the reflection. Alternatively if you’re pasting an entire layer, just make sure you paste at location 0,0 and everything will line up just fine. Either way, copy the master stencil layer, pick the transparent color with the stencil picker tool, and overlay the master stencil layer over the reflection stencil. It should look something like this:

Now, create a gradient that modulates in-between the colors of the water and the colors of the trees. Use the paint bucket to fill color-by-color over the new stencil outline layer, replacing the first color in the stencil gradient with the first color in the in-between gradient, and so on. Finally, set the new in-between gradient to cycle with the same frequency as the water gradient.

Using this same technique, we’ll apply it to a few other colors.

Distorting the Reflections of the Far Shore
This will be the simplest and easiest section. Find an area where there is a border between two or 3 related colors. Create a gradient that starts and ends at the same color, and create some lines around the borders of these colors like so:

Using the fill tool with that gradient and the linear gradient mode selected, fill in random areas within your lines to create the effect!

I’ll apply these effects to the the reflections of the far shore, sun, and sky to complete the effect at a distance.
Mimicking Fresnel
Fresnel, in the context of water animation, is the distortion of water relative to the viewer and object. Picture yourself standing in a pool of water, with your friend standing 100 yards away. If you look down, you can see your feet, but look at your friend and you see only their reflection! In the photo below, you can see some undersea rocks of the foreground, but soon enough only the reflection of the environment is visible.

Physically, this has to do between the angle of the viewer and the point on the water. Looking straight down is fairly clear, and further away is more reflective.
To do this, we’ll have a small wave cycle on the beach, and a few cycles for a gradiation between the water colors and the reflected sky color.
Let’s start with the beach! Create a mix of lines of two different colored stencils on the sides of the beach that face the current.

Create a gradient that blends the water current and the sand, then fill it into each stencil color in opposite directions using a linear gradient.

Because our current is fairly tumultuous, we’ll need at least 2 cycles to blend the sky and the waves. As you can see, the sky reflection I’m starting out with here gradually fades into the current via a dither. You can make the stencil for this by having a transparent color on one side and a stencil color on the other, pick the transparent color with the stencil picker tool, and painting the reflection onto that stencil layer.

Here I use the bottom two colors of the sky in the reflection to use as our gradation cycles, but you can modify those sizes as you see fit.
Performing a technique similar to the “distorting reflections” section, we’re going to use the areas of those colors to incrementally translate between the river current and the reflection.

Make sure the cycles furthest from the rest of the sky reflection have the most water-like colors, and those closest have the most sky-like colors

Notice that the bottom color cycle is made up of mostly water colors but has a few sky colors, and the top is the opposite. Additionally, the top doesn’t actually have any colors found in the rest of the water current; even the darkest colors are actually much brighter than the water current.
Voilà!

I hope this was illuminating, or at least a fun read! If you like what you see I’m always doing some kind of pixel thing on Twitter at https://twitter.com/thedeivore . As always, thanks for reading!